You can edit Real and Software Instrument regions in a variety of ways in the editor.
For Real Instruments:
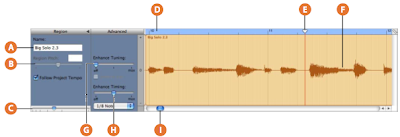
When you select a Real Instrument track, the editor shows the waveform of the track or selected region.
You can move, crop, join, transpose, and rename regions in the editor.

A - Region Name field: Type a new name for the selected region in the field.
B - Region Pitch slider and field: Drag the slider to transpose the selected Real Instrument region up or down by up to 12 semitones.
You can also type the number of semitones in the field.
C - Zoom slider: Drag to zoom in for a closer view or to zoom out to see more of the track or selected region.
Zooming in the editor is independent of the timeline.
D - Beat ruler: Shows beats and measures for the area visible in the editor.
E - Playhead: Shows the point in the project currently playing.
F - Waveform display: Shows the waveform of the regions in the track.
G - Enhance Tuning slider and checkbox: Drag right to increase the amount of tuning enhancement, or drag left to lower the amount.
The limit to key checkbox limits tuning enhancement to the project’s key.
H - Enhance Timing slider and pop-up menu: Drag right to increase the amount of timing enhancement, or drag left to lower the amount.
Choose the note value to use and the basis for timing enhancement from the pop-up menu.
I - Scroll bar: Drag the scroller to move to a different part of the track.
For Software Instruments—Graphic View:
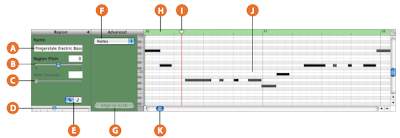
When you select a Software Instrument track, the editor shows a graphic display of the track or selected region.
You can edit individual notes in Software Instrument regions, fix the timing of notes, and transpose and rename regions.
You can also show and edit controller data for pitch bend, a modulation wheel, or a sustain pedal, recorded when you play your music keyboard.
 A - Region Name field: Type a new name for the selected region in the field.
B - Region Pitch slider and field: Drag the slider to transpose the selected Software Instrument region up or down by up to 36 semitones.
You can also type the number of semitones in the field.
C -Velocity slider and field: Drag the slider to change the velocity of selected notes.
You can also type the velocity value in the field. A note’s velocity reflects how hard the key is pressed when you play the note.
D - Zoom slider: Drag to zoom in for a closer view or to zoom out to see more of the track.
E - Graphic/Notation View buttons: Click to change the editor to graphic view or notation view.
F - Display pop-up menu: Choose whether to show notes or controller data in the editor.
G - Fix Timing button: Click to fix the timing of notes in the selected region, or notes selected in the editor, so that notes move to the nearest grid position.
H - Beat ruler: Shows beats and measures for the area visible in the editor.
I - Playhead: Shows the point in the project currently playing.
J - Notes/controller data display: Shows the individual notes of Software Instrument regions in a graphic format.
You can move and resize notes to adjust their pitch, where they start playing, and how long they play.
Shows controller data when chosen in the Display pop-up menu.
K - Scroll bar: Drag the scroller to move to a different part of a track.
For Software Instruments—Notation View:
You can also view Software Instrument tracks and regions in notation view.
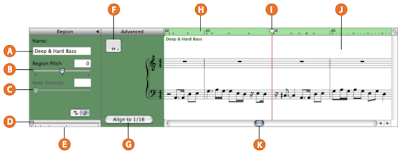
In notation view, notes and other musical events are shown in standard music notation.
You can edit notes and edit controller information (including velocity and pedal markings for sustain) in notation view.
 A - Region Name field: Type a new name for the selected region in the field.
B - Region Pitch slider and field: Drag the slider to transpose the selected Software Instrument region up or down by up to 36 semitones.
You can also type the number of semitones in the field.
C - Velocity slider and field: Drag the slider to change the velocity of selected notes.
You can also type the velocity value in the field.
A note’s velocity reflects how hard the key is pressed when you play the note.
D - Zoom slider: Drag to zoom in for a closer view or to zoom out to see more of the track.
E - Graphic/Notation View buttons: Click to change the editor to graphic view or notation view.
F - Note Value button: Click to choose the note value for notes you add.
G - Fix Timing button: Click to fix the timing of notes in the selected region, or notes selected in the editor, so that notes move to the nearest grid position.
H - Beat ruler: Shows beats and measures for the area visible in the editor.
I - Playhead: Shows the point in the project currently playing.
J - Notation display: Shows the musical events of Software Instrument regions in standard music notation.
You can move notes to adjust their pitch and where they start playing, and change how long they play.
K - Scroll bar: Drag the scroller to move to a different part of a track.
For Podcasts and Video—Marker View:
When you are working on a podcast episode, you can view and edit markers in the editor.
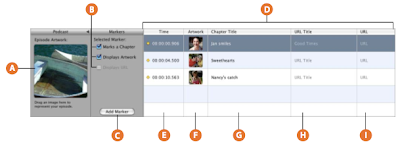
In the marker list you can edit each marker’s time position, marker region artwork, URL, URL title, and chapter title.
You can also add episode artwork in the editor.

A - Preview: (Appears only when creating a podcast.)
B - Marks a Chapter checkbox: Shows whether the selected marker marks a chapter.
- Displays Artwork checkbox: Shows whether the selected marker contains marker region artwork. (Appears only when creating a podcast.)
- Displays URL checkbox: Shows whether the selected marker has a URL.
D - Marker list: Shows each marker’s start time, artwork (for podcasts) or video frame (for videos), chapter title, URL, and URL title.
E - Time column: Shows the start time for each marker.
F - Artwork column: Shows the artwork for each marker region.
Add artwork by dragging image files from the Media Browser. (Appears only when creating a podcast.)
- Still Frame column: Shows the video frame at the position of each marker. (Appears only when working with a video.)
H - URL Title column: Shows the title of each marker region’s URL. Click and type a title for the URL.
I - URL column: Shows the URL for each marker region. Type a URL (address) for the website for which you want to show a link.
Selecting Regions:
In order to edit a region in the editor, you first select the region in the timeline.
To select a region, do one of the following:
- Select a single region by clicking it.
- Select multiple regions by Shift-clicking.
- Drag from a point before the first region to a point after the last one to select the regions in between.
Editing Real Instrument Regions:
You can edit Real Instrument regions in the editor in several ways.
You can:
- Move regions
- Crop part of a region
- Join regions
- Enhance the tuning of single-note (monophonic) regions
- Enhance the timing of regions
Moving Real Instrument Regions:
You can move Real Instrument regions in the editor in order to align them precisely with measures and beats, or with other regions.
To move a Real Instrument region in the editor:
1. Move the pointer over the top part of the region, close to the beat ruler.
The pointer becomes a move pointer (a vertical line with arrows pointing left and right).
2. Drag the region to its new position.
Cropping Part of a Real Instrument Region:
You can easily cut part of a Real Instrument region, whether at the beginning, the end, or in the middle of the region.
This is especially useful if you want to delete, move, or copy an individual note, chord, or phrase in a region.
To crop part of a Real Instrument region:
1. Move the pointer over the place where you want to cut the region (except at the top).
The pointer becomes a crop pointer (a crosshair).
2. Drag to select the part of the region you want to crop.
The selected part of the region appears darker blue.
3. Click the selected part of the region.
4. The selected part is cropped from the rest of the region, and is now a separate region.
You can select it, delete it, move it, or copy it, just as you would any Real Instrument region.
Joining Real Instrument Regions:
You can join Real Instrument regions that are next to each other in the editor.
To join regions:
- Select the regions, then choose Edit > Join (or press Command-J).
Enhancing the Tuning of Real Instrument Tracks:
You can enhance the tuning of a Real Instrument track.
This is especially useful when you record Real Instrument regions that have the right “feel” and timing but are not perfectly in tune.
When you use the Enhance Tuning slider, all regions on the selected track (both your own recordings and loops) are enhanced.
Enhance Tuning can only produce accurate results on single-note (monophonic) Real Instrument regions, so be sure the track does not include regions with chords or unpitched sounds.
By default, Enhance Tuning enhances the tuning of notes by moving them to the closest note in the project’s key.
You can limit the enhancement to the notes of the chromatic scale instead by deselecting the “Limit to key” checkbox.
To enhance the tuning of a Real Instrument track:
1. In the timeline, select the Real Instrument track you want to enhance.
2. Drag the Enhance Tuning slider right to increase the amount of tuning enhancement, or drag it left to decrease the amount of enhancement.
3. To limit tuning enhancement to the chromatic scale, deselect the “Limit to key” checkbox below the slider.
You hear the results immediately as the project plays.
Setting the Enhance Tuning slider to higher values can sometimes lead to undesirable results.
Listen carefully to the results of using the slider and set it to the value that sounds best.
Enhancing the Timing of Real Instrument Tracks:
You can enhance the timing of a Real Instrument track.
This is especially useful when you record Real Instrument regions where the notes are the right pitch, but are not perfectly in time with the project.
When you use the Enhance Timing slider, all regions on the selected track (both your own recordings and loops) are enhanced.
You can enhance the timing of single-note, chordal, and percussion (unpitched) Real Instrument regions.
Enhance Timing works better with regions that contain distinct patterns of notes than with pads or ambient sounds.
To enhance the timing of a Real Instrument track:
1. In the timeline, select the Real Instrument region you want to enhance.
2. Drag the Enhance Timing slider to the right to increase the amount of timing enhancement, or drag it left to decrease the amount of enhancement.
If you move the Enhance Timing slider while the project is playing, it may take a moment for it to “catch up” with the music.
The Enhance Timing slider may not work equally well with all musical material, especially when set to higher values.
Listen carefully to the results of using the slider and set it to the value that sounds best.
Editing Software Instrument Regions:
You can edit Software Instrument regions in the editor in several ways.
You can:
- Edit individual notes (including the note’s pitch, duration, and timing)
- Edit controller information (including velocity, mod wheel, pitch bend, and sustain)
Editing Notes in a Software Instrument Region:
You can edit individual notes of a Software Instrument region.
When you view the region in the editor, individual notes in the region are displayed in a graphic format:
- The left edge of the note shows the point in the timeline it starts playing.
- The width of the note shows how long it plays.
- The vertical position of the note shows its pitch, in relation to the piano keyboard displayed vertically along the left edge of the editor.
You can also select multiple notes and edit them at the same time.
Note: To edit notes in the editor, you may need to zoom in so that the notes are large
enough to select and edit.
To edit notes in a Software Instrument region:
- Drag the note left or right to a new starting point. You can use the beat ruler in the editor to align the note with a specific beat or measure.
- Drag the lower-right corner of the note to resize it.
- Drag the note up or down to raise or lower its pitch. Use the piano keyboard along the left edge of the editor to see the pitches.
To select multiple notes:
- Shift-click or Command-click the notes you want to select.
- Drag from a point before the first note to a point after the last note, enclosing the notes you want to select.
For example, if you select several notes and drag them to a new starting point, each note is moved by the same number of beats.
If you resize several notes at the same time, each note is shortened or lengthened by the same amount. If you drag several notes up or down to a different pitch, each note is changed by the same number of semitones.
You can also fix the timing of individual notes in the editor.
When you fix the timing of notes in the editor, the selected notes move to the nearest grid position, as set in the timeline grid menu in the upper-right corner of the editor.
To fix the timing of individual notes:
- Select the notes you want to fix in the editor, then click the Fix Timing button (with the text “Align to” followed by a note value).
Editing Controller Information in a Software Instrument Region:
Most music keyboards designed to be used with computer music programs include “controllers” for pitch bend and modulation.
These controllers are often circular “wheels” placed at the left end of the keyboard. Some keyboards also include other controllers, such as a sustain pedal, a foot controller, or an expression control.
Moving the pitch bend wheel while you play causes the notes you play to bend up or down in pitch, like a guitar.
Moving the modulation wheel creates changes in the sound of the Software Instrument.
The changes are different for different instruments, but often involve changing the frequency, rate, or intensity of a filter applied to the instrument.
If you move a controller while recording a Software Instrument, the movements are recorded in the Software Instrument region.
You can see the movements you recorded and edit them in the editor.
To display controller information for a Software Instrument region:
1. Double-click the region to open it in the editor.
2. Choose the type of controller information you want to see from the Display pop-up menu.
Controller information is displayed as a line with “dots” at different points in time, similar to the way volume and pan curves are displayed in the timeline.
Each “dot” (called a control point) shows a change in value (in this case the movements of the controller) at that point in time.
You can edit the controller information by adding new control points, and by adjusting control points to change their value or to change where in the timeline they occur.
To add a control point:
- Click the line in the editor at the point where you want to add a control point.
- Drag the control point up or down to a new value.
- Drag the control point left or right to move it to a different point in time.
